Generating Fixtures
Once you finalize the participants for your tournament, you can easily generate fixtures for your tournament from your tournament page for any tournament format you choose and save them.
Step 1: Click the Tournaments sub-tab in your profile page. From the list of your tournaments, click on the tournament of interest to go to the specific Tournament page.
OR
Type the keyword and search your tournament in the search field.
Step 2: Click the Fixtures sub-tab present in the middle of the tournament page.
In the tournament creation process flow which appears in the header, click the Generate Fixtures link present under Step 3.
Step 3: Select the division for which you want to generate fixture.
Finalize fixture button will appear only for divisions in which the participants are finalized.
Note: Before finalized participants, you can even just try generating fixtures by Clicking try fixture button.
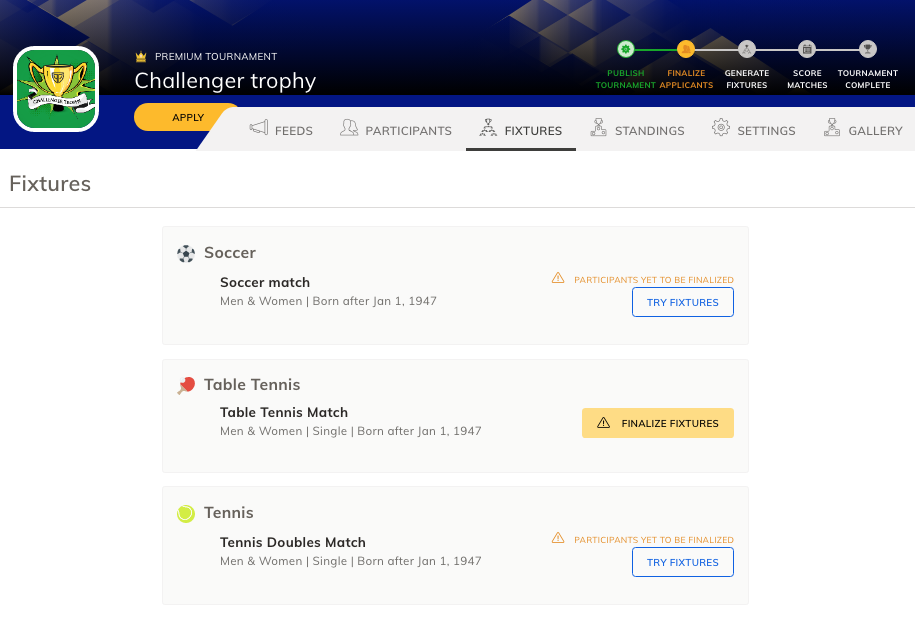
Step 4: To generate fixture and finalize, Click on Finalize Fixtures button.
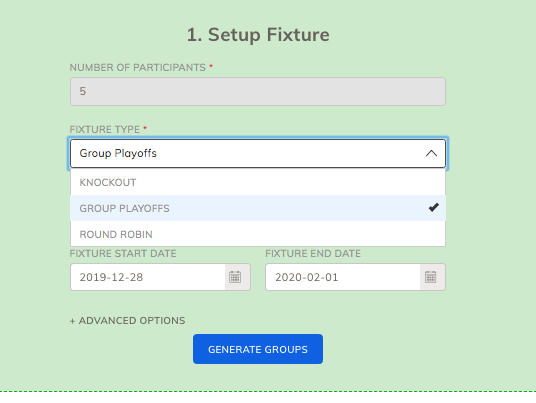
Step 5: A page titled Setup Fixture will be opened.
Step 6: Choose the fixture type from the dropdown.
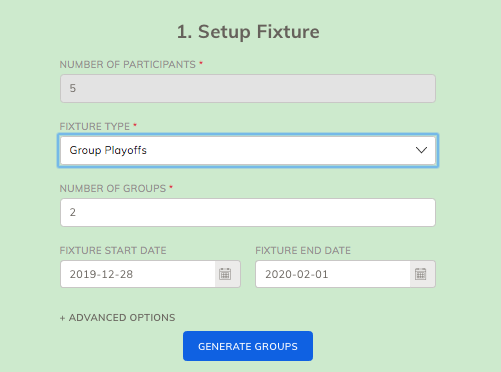
Note: Depending on your tournament type you can generate fixtures for Round-Robin, Knock-out or Group Playoffs. The field for the Number of participants in your tournament remains filled for your convenience, based on the finalized list of participants in the tournament.
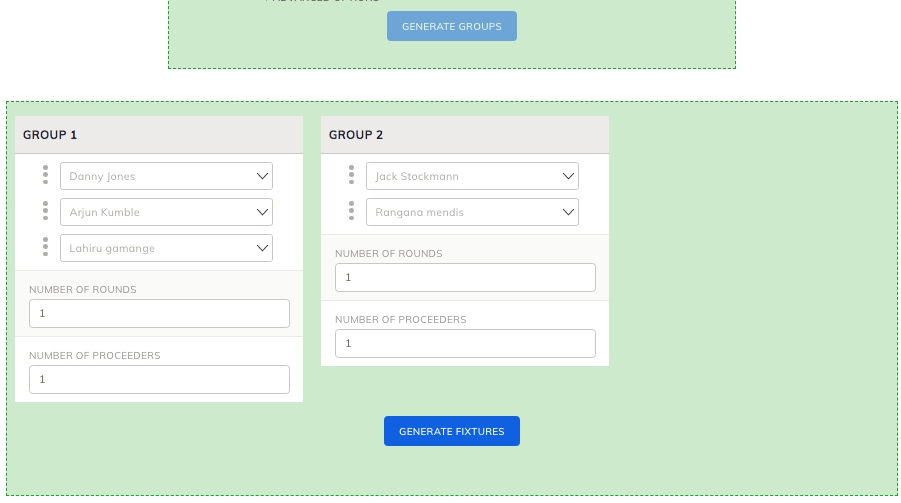
Step 7: For group playoffs and round-robin, give number of groups and rounds to be played.
Note:Configure the Winning points, Losing points and Tie points by entering appropriate values for them in the respective fields. For Round-Robin formats, enter the Number of Rounds you finalize.
Step 8: Select the Fixture start date and end date.
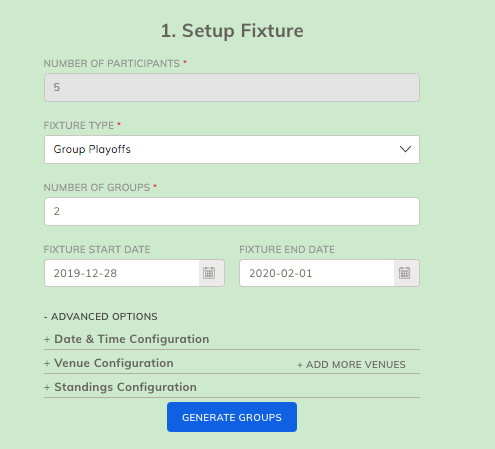
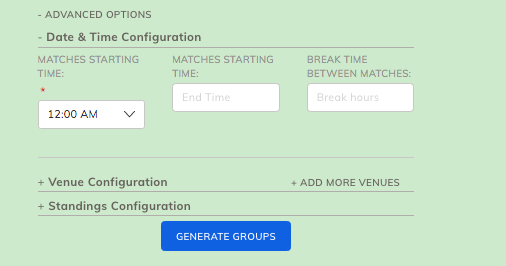
Advanced options -
Use Advanced slotting options to set a specific start and end time, to add an exact location for each match and to configure standings.
Step 1: Click on the advanced slotting dropdown.
Step 2: To set exact timing, click on date and time.
Step 3: Choose match starting time and breaking time between matches.
Step 4: To add more venue - click on venue configuration.
Step 5: Click on ADD MORE VENUES to add a new venue.
Step 6: A pop-up title Add Venue will be opened. You can search and select Playinga venues which are already created or can create a new venue.
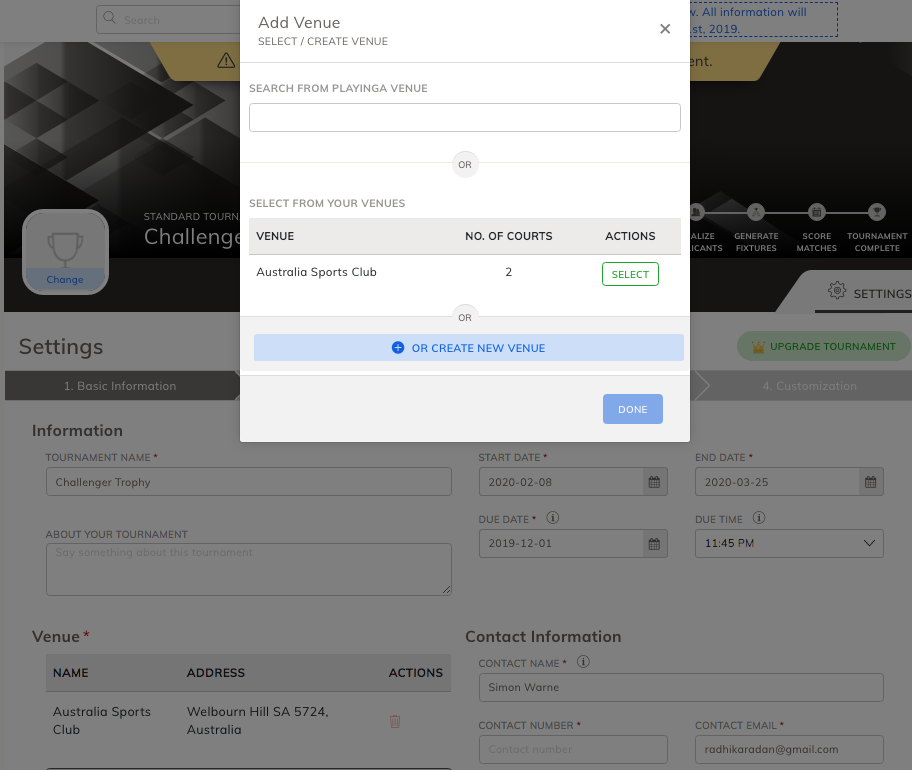
Step 7: Click on create new venue button.
Step 8: A pop up title ADD VENUE will be opened. Fill venue name, Select the exact location on map, Venue opening time and closing time along with venue court
( you can add any number of courts with a unique name.)
Step 9: Click on Create venue and Proceed button.
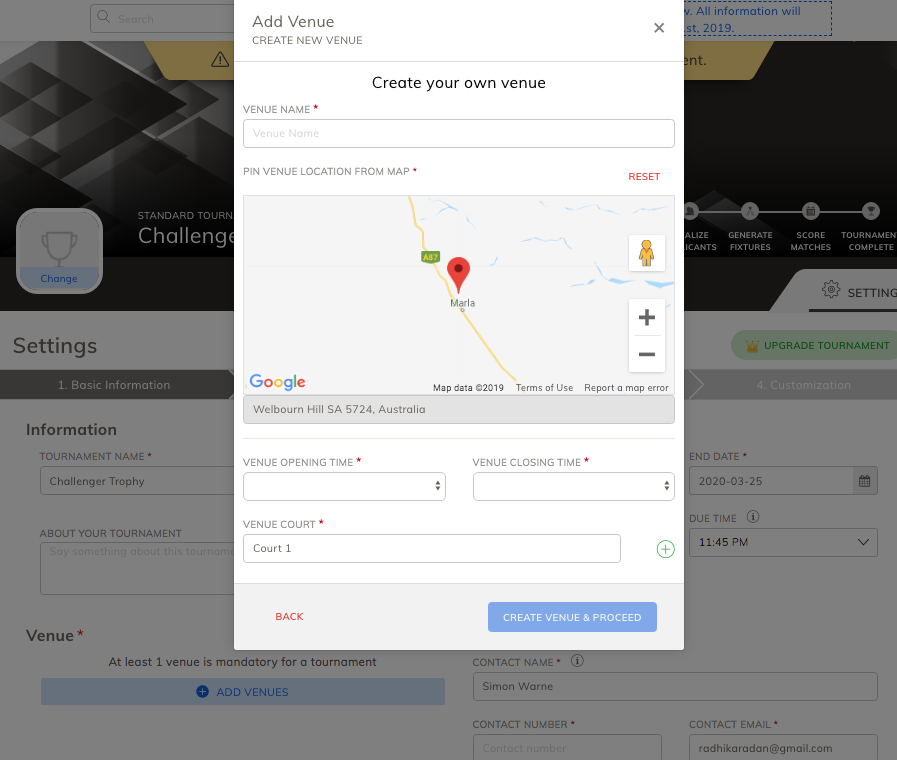
Thus the venue will be created and added.
Step 10: Venue added will be shown on the previous popup. Select or unselect the venue and click on Done.

To configure standings - Click on Standings Configuration.
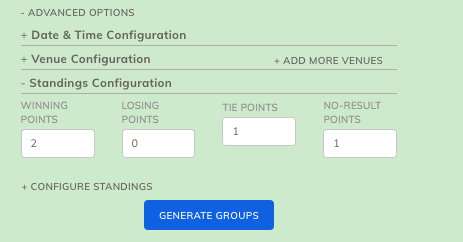
Step 11: You can edit the winning, losing, tie and no result points to be calculated.
Step 12: To configure Point systems and standing settings, click on configure standings.
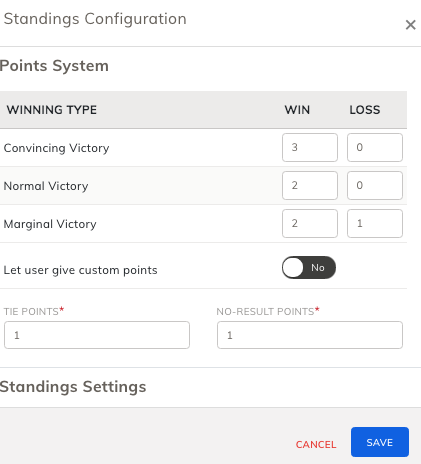
Step 13: Setpoints for Winning, losing and tie the way you want.
Step 14: To change the points for each game, Select yes on Let user give custom points.
This will allow the user to enter points on the score page.
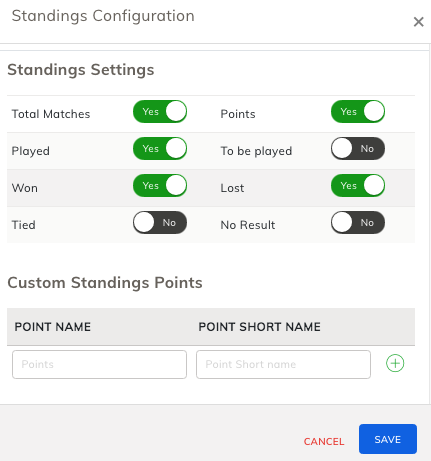
Standings settings -
As a tournament admin, you can set how the standings should be.
Step 1: Scroll down to Standing settings on standing configuration popup.
Step 2: Set visibility on the default settings available.
Step 3: To add custom standing points, enter point name and short name.
Step 4: After setting the point system and standings settings click on Save button.
Step 5: Click the Generate Fixture/Group button at the end of the page to generate fixtures for your tournament from start till finish.
The details of the fixtures appear on the screen which can be saved.
Step 6: A preview of fixtures generated with player names and dates will be shown.
Step 7: Change the arrangements if needed and modify the date and click on Save & Publish button.
Note: For Group playoffs, you need to click on generate fixtures and procced with save and publish.
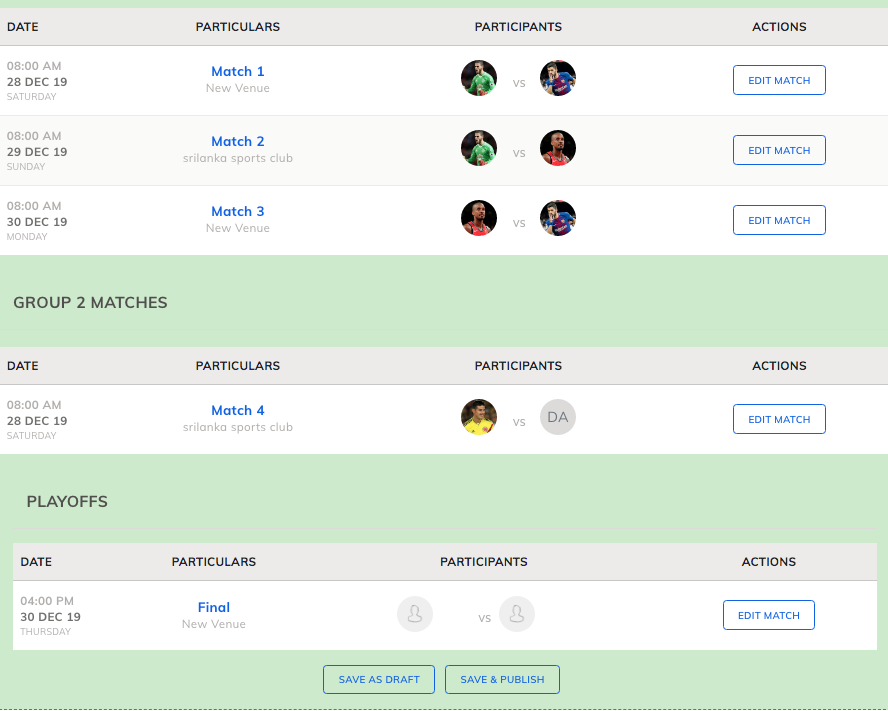
Step 8: Thus the fixture will be generated and save & Publish button will disappear.
Editing match date, timing and venue-
Step 1: Click on the Edit match button corresponds to match the name.
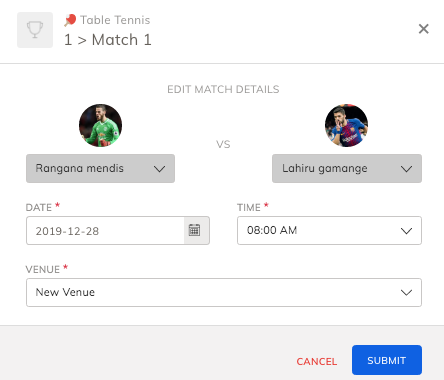
Step 2: A pop up with match details will be opened. Change match date, timing and venue.
Step 3: Click on the submit button.
Note: You can edit match only before the match gets scored and published.
Note: In case you have not finalized the participants for your tournament, you can still get a preview of fixtures. But in order to create fixtures that are usable, you first need to finalize the participants for the tournament.
Connect On Social Media
Connect with us on facebook, twitter and linkedin


Schedule A Free Demo
Seeing is believing: Book your FREE PLAYINGA demo today.
Related Articles
Tournament Progression
Once the tournament fixtures are generated, a match page gets created for each fixture. Only the tournament administrator can enter the scores for each match fixture. As the tournament progress and as the tournament administrator enters the scores of ...Manage On The Spot Registrations (Non PLAYINGA Users)
PLAYINGA helps tournament organizers capture the player or team’s information on the spot. We have a lot of tournaments where you will have players and teams show up on the spot for registrations. This feature helps tournament organizers manage ...Finalizing Participants
Once you organize a Tournament on PLAYINGA, and after you may have received qualified applications, the next step would be to finalize participants in the tournament. This will help you generate fixtures. To finalize participants for your tournament, ...Whom it is meant for?
PLAYINGA is meant for any sports enthusiast, fluidly designed to enhance the sporting experience of every player’s and team’s demands of each game. PLAYINGA simplifies the way matches or tournaments are organised, tracked and captures the excitement ...Concepts
Who is a Player? Every sports enthusiast is a player. Every logged-in user in PLAYINGA is a Player. Who is a Friend? A friend in PLAYINGA is a known person to a player. You can have many players whom you know. You can connect with them as Friends. ...
Announcements
Welcome to Community
The Community hub inside Zoho Support lets you build a powerful community around your business, while still serving customers via other channels. Your customers can post 4 types of content within your community. These are Ideas, Questions, Problems and Discussions. Each of these serves a particular purpose. When your customers have something to discuss with you, they can post a discussion within your community. It's a great way to debate and collaborate. Your customers can ask you specific questions

Service Request
If you can't find the answer to your questions in our resources, submit a ticket and we will get in touch with you.